How to remove a 360 immobilizer box
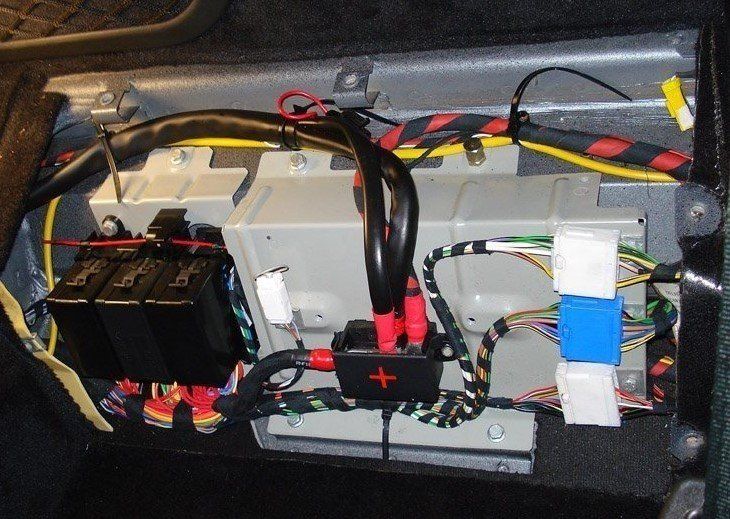
Move the drivers seat to the full forward position and lean the seat forward. Shut off power to the car at the disconnect switch in the front passengers side under the hood. Remove the trim panel on the wall behind the drivers seat to expose the area shown below. It's the lower carpeted cover fastened by 4 phillips screws. The immobilizer is under the aluminum cover seen on the right side of this picture.

Here is a closer view. You will remove the large aluminum cover seen on the right side of this picture.
First, disconnect the white/blue/white connectors on the right side of the picture.
Next, snap the cover of the battery terminal down to remove the nut off the far left stud. Remove those two cables to expose the nut to the left that holds down the battery terminal. Remove the two nuts that hold down the battery terminal. Don't lose the washers!
Once the battery terminal is out of the way, remove the four bolts that hold down the aluminum panel and flip over the panel. If you have a spider, you may also need to remove a bolt that holds a fuse terminal to the cover (and move that cable out of the way) and a bolt that holds a cable clip on the top right of the cover.
Disconnect the wiring harness that go to the larger box by pressing down the center tab and pulling on the harness.

Under the aluminum cover, you will find the immobilizer box and interface box. Remove the larger immobilizer box and you're done.

Once you receive the immobilizer back with the fobs installed, re-install in the reverse order.
TIP: Route the antenna wire out from under the aluminum cover to extend the range of the remotes, if desired.
